Monday 9 February 2015

My modelling hobby history

The mid 1970's is where model making all began for me. I loved Lego as a child, so I suspect this was just a natural progression only this time I got to cover myself in glue! My first kit build recollection was a 1/72 Matchbox Lysander given to me whilst on a beach holiday. I used to read regularly published comics like Warlord and Battle (remember Charlies War?) The handy small pocket-sized Commando books were a huge distraction from our lengthy and monotonous journeys over to North Wales and I was always fascinated by the artwork. So, on one occasion the opportunity to build an aircraft that featured regularly in these comics must have been eagerly taken up.

After a short while I figured AFV's captured my interest far more than aircraft. I think it was a combination of it being easier to display them safely (remember how dodgy the undercarriages were if you didn't use the clear plastic ‘Star Trek shaped’ display stands) and that the local newsagent stocked mainly Matchbox 1/76 tanks.  Amazingly I still have a few Airfix 1/32 figures and the bulk of a very early 1970’s 1/35 Tamiya Tiger I.


1/32 Airfix German Infantry figure
 
Early 1970's Tiger I


So, forward some 35 years to 2010 and a chance encounter browsing a scale model publication had my passion for modelling suddenly re-ignited. Whilst resting my weary feet on a family shopping spree I found myself in WH Smith the stationers browsing (like you do) and happened on a modelling magazine. 

 
Isn't the Internet a wonderful thing?  Within a few weeks I had discovered a host of other publications and articles and hastily went about sourcing the ones that caught my eye.  I then realised that the fascination I had as a junior with all things WWII and especially anything German vehicle related had me focusing on axis armour and soft skins. Some of the features and photographs I found on the tinterweb were incredible and I had to get engaged again. Inspiration came from many places including manufacturers catalogues, an Adam Wilder article, the Little Norway web forum, the Scratchmod website and the Panzerwreck series of publications amongst others. I was now itching to get started; but I had no models! I didn’t have a work space and I certainly didn’t have any tools, glues, paints or brushes. This was to be remedied immediately!


It didn’t take long to acquire the basics and with the help of a certain online worldwide bidding platform I had my first kit. It was the Tamiya 1/35 Steyr 1500. The first thing I noticed was how soft the plastic was. Even though this was a pretty ancient release the injection mouldings had come a long way since I remembered building a plastic model.


I soon became a member of a few modelling forums and watched and learned which manufacturers were held in best regard. The information we can all obtain on the net is vast and there is an abundance of great advice from organisations and individuals alike.  I was however a little alarmed that the majority of these forum's had a clique of outspoken individuals that constantly bemoaned, and unfairly criticised other members builds and new kit releases. It all seemed a little odd to me that they could get so worked up over a 'plastic toy!  

I was fascinated in individuals who were scratch building kits and those that had small business concerns manufacturing kit upgrades and accessories. I liked the passion they had and the enthusiasm for researching particular vehicles and military unit locations in different conflicts.

I began researching kits before making purchases and found the Perth military modelling site invaluable. Although the site has not been  updated for a long time I am glad that Terry Ashley has recently got back up and running again on FB. His reviews have great step by step build advice on pretty much all the new kits on the market and a neat section showing all the upgrades and accessories available for any one vehicle. His site also offers advice on manufacturer errors, scale reproduction quirks and the relevant remedies available.


Although I only re-started scale modelling in late 2010 I was very much, and still am, learning on the job.  Although my eyes need plenty of visual assistance and the old eye to hand co-ordination was not what it used to be, I believe with a great deal of patience and perseverance I can achieve at least a fraction of the abilities of some of the well published and talented AFV
modelers.


Friday 30 January 2015

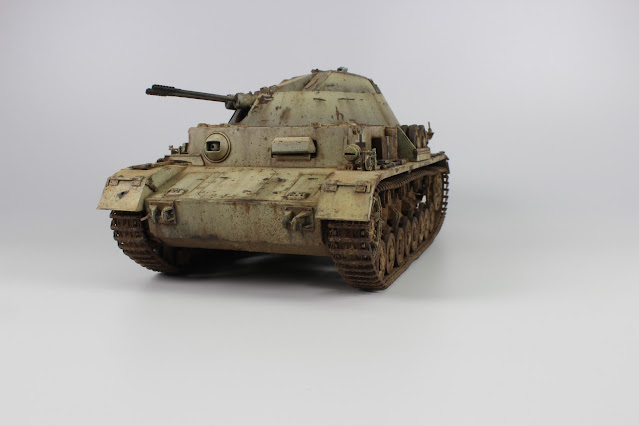
3cm M.K. 103 Zwilling Flakpanzer IV "Kugelblitz"

Cyber-Hobby's re-released Panzer IV Flakpanzer Kugelblitz


Although very few photographs survive of this prototype it still makes into a very pleasing model. A review can be found below

http://www.missing-lynx.com/reviews/german/dml9109reviewcs_1.html


Finished with the Vallejo Dunkengelb modulation set, Abteilung oils and Mig pigments, I completed this in 2014


Saturday 10 January 2015

My model making journey 2010 to 2011


Its late 2010. After starting the Tamiya Steyr kit I found a bunch of old modelling stuff at my parents. These included some quite well preserved figures, paints and even the old but battered 1970's Tamiya Tiger 1. What surprised me most of all though was that some of the Tamiya paint's were still usable!

I figured the Tiger 1 would be a great guinea pig so I set about trying out some of the latest techniques. One thing that I picked up early on is that the large Tamiya spray tins are not really suitable for 1/35 scale kits and I would have to get my hands on an airbrush. I did some research and soon acquired an Iwata HP-C-Plus airbrush and compressor.

The Panzerwreck books really appealed to me so from the very start I was attempting to convey some wrecks. Scratchmod's site was a great inspiration and I soon set about destroying brand new (cheapo
) kits in my attempt to display wrecked vehicles.


                                                Tamiya's ubiquitous Opel Blitz gets the scalpel treatment.


Then painted in Vallejo acrylics


AFV Club's Sd.Kfz 11 early production got the same treatment


Around this time I started photographing my creations and it was apparent both my building and paint application needed drastically improving. I experimented with different techniques and different paints and realised that my airbrush much preferred Tamiya over Vallejo and that mix ratios and air pressures really were the key. I stopped using the salt technique and finessed the application of hairspray in between subsequent layers of paint to minutely chip and distress the surface to reveal underling primers and even bare metal. It was clear that to display scale realism in this department less was most definitely more. I often attained good results with one medium only to cock it up with another. I also started experimenting with pigments and oils and a huge number of kits were started and never finished such was my appetite and impatience .


Zvezda's Mercedes L4500 was used to test the many variations of Dunkelgelb acrylic paints on the market and whether different brands could be combined. 


I really liked Vallejo's light and dark rubber acrylics for tyres and this model also had many different kinds of pin washes tested on it


Cyber Hobby Sd.Kfz 251 Ausf C with the Verlinden engine and interior set. I used Friulmodel tracks for the first time. They made the model extremely heavy and looked to my eye a little bulky but they were excellent to work with and gave the track sag a much more realistic look. 


The kit's lower and upper hull fit was not good so I ended up butchering one side to depict a round had hit one side.


I learned a great deal making this kit and thoroughly enjoyed my time with it. I see so many issues with it now but what I gleaned from making those errors has given me a much better understanding of what constitutes a well finished and realistic scale model


My last model of 2011 was Trumpeter's Sd.Kfz.7 KM M11. It has undergone a few changes over the years and has been used as a guinea pig several times to work with new mediums and ideas  


    Completed in 2011  


       Stripped in 2012 


Distressed in 2013 


Left out to pasture in 2015


So as 2011 came and went I was relatively pleased with progress. My next goal was to get to grips with improving my finish with the airbrush and even attempt a resin kit !