
Trailer: WM resin & 3D printed
Barrel: ABER
Photo Etch: Kit supplied etch
Wheels: QuickWheel QWX-027
Start date March 2015
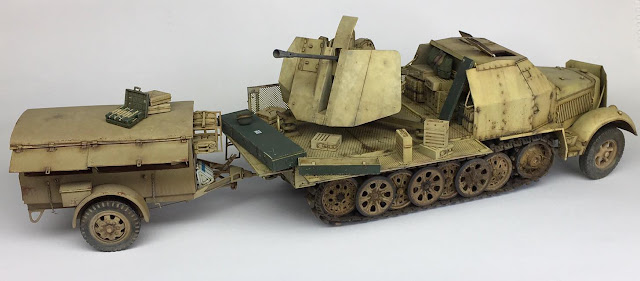
This Sd.Kfz.7 SP Flak kit was purchased and work commenced many moons ago. As of Jan 2023 99% of construction work had been completed. These are the only pics I have from the build stage.


Like all Trumpeter's 8ton series these kits can be somewhat challenging to build. Accuracy issues aside, the main chassis is a multi-part affair, and although well detailed once built up many of the part location points are not well defined. Smaller parts often require plenty of test fitting and judicious amounts of clean up to avoid missaligning assemblies. There are also a few places where crude moulding hampers construction, making swift progress somewhat frustrating. Another problem is the instruction to fix many fragile parts way too early in the construction steps, makes damage all the more likely. Once you realise that a fair amount of pre-planning, clean up, and test fitting is required at almost every stage, you have to be prepared to put the time in to rectify these issues. If you do the final result can be rewarding.
- In step 1 to prevent almost inevitable damage, leave off adding the cab control levers onto the gearbox until the cab is added onto the chassis.
- In step 2 the gearbox assembly is only connected to the chassis by rearward attachment points. It will pivot unless held perpendicular to the chassis frame whilst the glue dries. If that perpendicular alignment is out, fitment to both the engine shaft and the winch shaft will be difficult to fit. There is also no real rush to add it until step five if you wish.
- In step 4 part E19 should, but does not sit flush inside part E36. It will require sanding down. If both parts are not flush it will extend the whole engine assembly lengthwise by a fraction, and will make engine fitment onto the chassis mounts problematic. Test fit before commiting the glue!
- In step 5 ensure forward engine mount parts B48 are added well before the engine is added to prevent distortion. Leave shackle parts B37 free to rotate on the chassis as fixing them may impede location points of the cargo bed framework in a later step.
- When adding the fuel tank bracket parts D41/42/43 & 44 in step 5, I recommend building up the whole fuel tank shown in step 7 first. It can be used as a template to assist in getting the brackets to locate correctly on the chassis legs.
- Part A22 in step 7 is asking to be damaged if fitted in this step. It can be fixed in place just before adding the front fender moulding shown in step 16 if you wish.
- For attaining the perfect track tension in step 8, it is advisable not to glue the idler arm mounts (parts A18 & 20) into the chassis as per the instructions. Wait until after you test fit the tracks. It is also worthwhile adding both idler wheels onto the idler arm mounts first and allow the glue to cure, as the location points are very shallow.
- In step 9 it is not essential that you add the steering column to the chassis, but it must be added before the bulkhead assembly in step 26 if you want to display a full column (it can be seen if the driver's side engine panel is open). If the engine bonnet/hood is to be fitted, and the side panels are to be closed on your build, the steering column can be safely cut in two around the centre point if you wish. This will make construction into sub-assemblies a whole lot simpler, especially if you want better access to airbrush the cab interior. The lower half of the column with the steering box must be added to the chassis to allow the steering linkages (shown in step 11) to be added. The top half can then be added to the bulkhead assembly and fixed onto the instrument panel with the photoetch brackets. Spacing is easily worked out for adding the steering wheel at the correct height.
- Also in step 9 the double wheel stub axles (parts 29) were a decent friction fit to the chasses in my kit, so there was no requirement for glue. Leaving them unfixed will also allow articulation of all the track wheels so they can sit naturally down on the tracks in whatever orientation the vehicle ends up at. If you are tempted to glue the track wheel stub axles in place in this step, don't! To have the wheels and tracks lie completely flat the front wheels must be test fitted first. Doing this will confirm the angle that the whole chassis will sit at. With the front wheels added it slightly raises the front of the chassis and confirms the angle that the stub axles need to be fixed at if you wish the vehicle to be displayed on a completely flat surface.
- In step 10 the front wheel hubs can be angled but the engineering is a very sloppy and loose fit, making the wheels droop inwards! Shims can be added to stiffen things up but it is just as easy to choose an angle and fix them in place. *If you do choose to angle them then the positioning of all the steering linkages to the steering box must be adjusted to suit. The positioning of these linkage arms (displayed with the wheels at the straight-ahead position) are in the line drawing shown in step 11.
- The sprockets are built up in step 14 so the fix found here will need to be made to ensure good track fitment.
- Before adding the front fender moulding (part WA4) in step 16, remove the three large nut detail that are added over the three dome shaped rivets at the lower front of each fender. The domes should be present, but the nuts should not. Trumpeter has mistakenly referenced an incorrectly restored vehicle. It is also worthwhile adding the exhaust parts before the tracks in this step, as a fair amount of handling will be required.
- Good clean up of parts WB1/WB1/WB5 & WB6 is essential in step 17 as these dictate spacing between the bulkhead assembly, the cab floor, the chassis, and ultimately the final position of the bonnet, and all the engine panels. They are quite crudely moulded, and the location points are far from precise. Plenty of test fitting of all these components is required to get the best fit once final sub assembly connections are made in step 26.
- The angle that parts WA1 and WA2 sit on to the underside of the cab floor in step 18 is not at all obvious, as the location holes are very shallow. Once the cab floor is added they should sit inwards of the centreline of each chassis leg. Keeping them equidistant will ensure the cab sits square on the chassis.
- Following the instructions and adding the cab floor to the cargo bed assembly shown in step 25 can make fitment of this whole sub-assembly to the chassis tricky. As there are no precise fixing points for the cab floor the only visual alignment clue is via the tucked in track guard portions under the step portion of the front fender mouldings. If anything is slightly warped on the multipart chassis assembly and is not 100% straight then the cargo bed fixing points will not align, making the whole fixing process frustrating. I've always found adding both cab and cargo body separately a preferred method. Both parts butt tightly up to each other anyway.
- The fender support brackets (PE-WA10 & 11) do not fit the contoured detail on the underside of the fender moulding very well so they have to be manipulated and bent to fit!
- If not wanting to display the engine I would recommend building up the radiator housing and engine panels shown in step 29 as early as step 17 so as to use them as a template for getting the best alignment of all the other cab sub-assemblies. The one-piece armoured cab moulding comes in handy for this purpose also.


The wheels were primed then given two light mist coats of hairspray and then base coated. The tyres were brush painted with a mix of Vallejo's light and dark rubber. The metalwork parts then received small scuffs and scratches to reveal some of the red primer.


Now onto the Flak 43. The kit's missing second gunners seat still needs to be added and more research is required into whether a basket cage for the spent shells was added to these mobile flak variants. The kit does not include one! This was then painted in a similar way to the vehicle but with slighter lighter tones of Dunkelgelb.

Building in three sub-assemblies (bulkhead with instrument panel, column and steering wheel, cab floor and rear panel, and the top armoured cab moulding) the interior can be easily accessed with an airbrush whilst still seperate. They were again painted with Tamiya acrylics and once dry the instrument panel decals were added. I then applied a pin wash with Abteilung oil paints followed by some light weathering with both oil and pigments.


August 2018
After many months sat on the shelf of doom I recently got round to tinkering with this again and figured I needed a plan of action to push it over the finish line.

Once the Mission Models base coat had dried I then set about distressing this layer with warm H2O, several brushes, and various sharp implements, to create small chips, scratches and scuffs. Once I was happy I then airbrushed a light coat of satin varnish to seal in all the work so far.

After setting the model aside for 24hrs I applied a pin wash with oil paints. Utilising the excellent Abteilung 502 series I employed several umber and dark brown tones first, adding slightly darker colours lower down on the bodywork. The same mix of oil paint tones was also employed to add light vertical streaking to the cab areas. The engine bay was then treated to the same oil work and some enamel dust effects.

Enamels, pigments, and oil paints were all used to weather the running gear. The outer road wheels were deliberately left off to make this process easier. Once happy with progress the outer wheels were then fixed in place.


I wasn't impressed with how the kit's vinyl tyres were looking (seen in the pic above) so I replaced them with a Quickwheels resin set. These come in two parts; the tyres and rim, and the hub and spokes. I had to slightly rework the axle hub attachment points to make them better fit, but the effort was well worth it. Once weathered and added they were a big improvement. (compare pics below with the kit vinyl items above)


At this point I realised I had completely forgotten to add the licence plates decals! A step I regularly add straight after the base coat. This was remedied with an aftermarket individual letter/number set which will make things easier to match with a trailer. I then added the painted and weathered radiator armour and cab roof hatches.
After looking at several images of the cargo bed platform and how the Flak gun mounts to the deck, I realised the kit has omitted to include the ratchet handles on the platform legs. These allow the gun to be raised and lowered. I found suitable looking replacements from the parts bin and added them. The rear crew seat was added folded up and the platform sides were fixed in place. I knew this would be tricky after painting the components first, so I made sure all paint was removed from the connection points to allow good adhesion. One platform side panel was mounted for transit and the other positioned folded down. As one of the steps on the rear panel was built unfolded that was also positioned for action.


The front fender visual driving markers and cab door mirror are still to be attached, and to avoid damage these will be attached right at the end of the project. More work with oils and a layers of dust effects are still to be added to lower areas of the body and running gear. The flak platform also needs more work to blend in the ammo boxes and crew paraphernalia, and I have yet to add delicate items like chains to the platform side hooks, front and rear towing points, and lockers.

The ammo trailer
September 2018
It is basic in many areas but it builds up well. Care is needed when removing the casting blocks as some of the parts are extremely thin. The roof on mine was seriously warped and although it was left in warm water and straightened it is still not perfect. The ammo boxes included in the kit are for the Flak 30/38 and not accurate for the Flak 43, so an aftermarket set will have to be sourced.


March 2020
The UK pandemic lockdown is upon us but TBH I never personally felt anyno massive hardship. For those that are happy working many solitary hours at the bench it has enabled even more free time for me in the man cave. The plan is to finish off a whole bunch of shelf queens including this project.
Next up was to rectify something that had been bugging me for a while. One engine side panel was a really tight fit so I decided to remove the radiator housing moulding and re-align it on the chassis. Ah, that's better 😃

After taking some further photographs I felt that some already applied rain streaks wore too strong and needed toning down. It was easy to reactivate the oil paint with AK turpentine. I also thought the body panels required more depth to the finish, so I decided to do a little mapping with oils. I used Abtielung 502 Buff, Raw Umber, Black and Engine Grease. The following pics do show further tidying up of the oils is still required, but I will let them dry for another 24hrs before further blending them into the paintwork.

Happy to proceed I then gave the panelwork areas more of a worn appearance. using a splatter airbrush stencil for the first time. I first practised on a spare old model to ensure I could atain the correct effect I was after, and then gave areas on the model a coat of chipping fluid through the airbrush. This would give me the opportunity to clear up any mistakes.


As a few areas of the pinwash had now been lightly covered with this new effect I employed a few more Abteilung 502 oil colours to re-define and pick out the recessed details once more.

May 2020
Sd.Ah 56/57 Trailer

I was looking over wartime photographs
and noticed a lot of these trailers had additional racks or boarded compartments
bolted onto the roof. As the Wiener Modellbau version has the later curved roof
I decided to add a jerry can rack to the front panel. Making sure positioning
cleared any opening trailer hatches and would not interfere with the towing vehicle, I liberated the rack of a Bronco Sd.Ah 52
kit.
The trailer was then carefully washed to remove the resin release agent. I then gave it two light coats of Tamiya Red Oxide Fine Surface Primer followed by a couple of fine misted coats of hairspray. The base coat was made up using several Tamiya Acrylic dark yellow 2 mixed 50/50 with tap water.
Graduating the colour from the darkest mix at the bottom, first up was a XF-64/XF-60 mix. Higher up the side of the trailer received an XF-60 mix, and the upper most sides were covered with just XF-88. Finally, the lightest XF88/X-2 mix was airbrushed from above to highlight the upper surfaces
Again I utilised a splatter airbrush stencil in the same way I had with the Sd.Kfz 7/2. Giving the surface a light misting of chipping fluid beforehand will always give you the option to town down any areas that you feel might spoil the effect. Lastly, I highlighted raised details with Vallejo Buff and sand coloured Acrylics. I then added a blank licence place and divisional insignia decals. The last step was to airbrush a filter using a mix of X-24 and X-35 to harmonise the overall look

The next process involved giving the trailer a pin wash to pick out all the recessed details. I mixed up some Raw Umber and Dark wash Abt 502 oil paint mixed with white spirit. I always clean up any serious overspills on the lighter parts of the paintwork immediately with pure white spirit and then set it aside for 12hrs to let the oils dry a little. I find leaving it for this time makes blending any overspill into the paintwork an easier task and I never have to worry about blending the colours out too much. The easiest way I have found is to moisten a flat brush very lightly with white spirit, ensuring to wipe off all the access. You do not want the oil to wash out so using a dabbing motion I carefully feathered in the oil into the surrounding paintwork. This always gives a nice transition and contrast from the previous lighter highlighted raised detail. To compensate for any areas I still felt were too dark, I dry brushed in Buff coloured oil to further pick out detail I felt had been lost.
 |
To weather the trailer, I airbrushed a buff/flat earth mix of acrylics
over a coat of chipping fluid to the lower parts where dirt and mud might accumulate. I then chipped off areas of the paint with a downward streaking motion. The
tyres were hand painted with my favourite brush applied acrylic colour; Vallejo dark rubber. A final weathering round was completed with a combination of mud coloured acrylics and enamels.


Without finalising whether I would incorporate figures or just display it as abandoned vehicle I still figured plenty of crew gear and Flak ammo would still be present, as much of it was stored externally.
I sourced my 3.7cm ammo boxes from various aftermarket companies with the best value option being Bronco's Sd.Ah 52 and Sd.Kfz.6 flak kit's. My understanding is the Flak 43 ammo came in both 6 and 8 round boxes so I guess a combination of both would have been used. The Bronco Sd.Kfz.6 kit also has a spare barrel and rangefinder with transport boxes, and although the barrels cannot be used the boxes themselves make great additions. Other items included jerry cans, beer crates and other personal crew equipment.

More work is yet required on the above gear to give a little bit of variation to the Dunkelgelb finish. Likewise the leather areas will receive some oil mapping. None of the accesories will be attached until the vehicle is finaly set on its base.
Although it would have been best attaching at the building stage, I do have a spare cab I might use as a template to drape a tarpaulin out of magic scupt. I also think it would benifit a few richer coloured items to contrast against the monochrome finish. Time to look up some war time reference pics for inspiration.
March 2022
This has been a real slow burner of a
project. Seven years almost to the day in fact! Conceived in November
2015 it sat on the shelf of shame awaiting paint until
2018. It then took a glacial two further years to get to the weathering
stages, where upon I discovered all the Trumpeter Flak ammo trailers
provided in their kits were pure fantasy. I then tracked down the Wiener
Modellbau Sd.Ah 57 resin kit. This took another year to complete so 2021
comes around and a lovely fellow by the name of Darius Stucinskas
releases a beautiful and extemely accurate 3D printed kit of the Sd.Ah 56/57 trailer.
CAD images


Darius was kind enough to send me a whole trailer kit, as well as many extras and work started in the summer of 2022. Build steps can be found here.
Although I had fixed the hinged side and rear panels in place, luckily, I hadn’t fixed any of the accessories, so along with the new sublimely detailed 3D ammo containers and shells, it is now time to complete painting duties on all the numerous items and decide on final placement.
The following pics shows me tinkering with accessories placement

The wine box, suitcase, backpacks, and water cannisters are yet to receive their final filter coats along with highlights and shadows with oils. Some items like the helmet require a strap and a little tidy up. The rangefinder box still requires a few stencil markings and some other items yet to be added will add a welcome splash of colour.

The small base it is currently sat on is an unpainted WIP for
another 8 ton cargo variant I am currently building, and is just a
convenient surface to take some pics of progress so far.


A few areas that I really should have updated during the build stage but didn't! As already mentioned the two front vision ports have interior armoured vision blocks that didn't come with the kit. I had closed up the cab before I realised. Likewise, the seven grooves on the sprocket face should not be present and I forgot to address this too before paint. An interior handle was added to the open cab door


No comments:
Post a Comment