After
a month away from the bench I've taken a fresh look at how the whitewash looks
and although it didn't come out at all as I was intending, a step away has made
all the difference. I’m now slowly working my way through areas of the cab that
I feel still need improving and have started on a list of small things to do to
prepare for all the sub-assemblies and tracks coming together.
As per the war time image, the driver’s side screen was missing. This was fortunate as the kit screen has the older style split opener on the driver’s side. It was little tricky to remove just the screen portion as both screen and frame come as one clear part plastic moulding. I cut out a square of material with a cutting disc from the centre and then carefully sanded outwards leaving an equal amount of material to replicate the surrounding frame. A small area of broken glass was left in one top corner. Three small pins were then added to the top of the frame. These were to hold the cab canopy in place.
Other small updates include, painting the rubber hose between the foil made retaining bands on the air cleaner hose and added some shadows to the engine rags. Improving the heated rust effects on the manifold and adding a shadow coat to the bench rag and rope and chipping back the base coat of both the gas mask and canteen lid. I've tidied up a nick down to plastic on the passenger side fender front near the headlight by adding some Lifecolour Base Coat Rust so replicate a fresh scratch and have cleaned up the paint on the cargo bay rags, tarps and accessories ready for highlights and shadows with oils. Finally, I have started mapping out the surface of the whitewash with Abtielung white oils. A pin wash with MIG Neutral Grey enamel has also been added to add a little definition around small details.
|
Weathering the tracks
Conscious the vehicle I was representing had not moved for some time, the tracks were made a little rustier and only given a light weathering. As I was using the kit’s plastic tracks, I decided to stay clear of Enamel products. There are plenty of alternatives these days and Uncle Nightshift has a fantastic, dedicated video on how to achieve excellent results with only acrylic products…. Well, almost exclusively Whilst I didn’t have all the products that Martin uses, I did however have the most excellent Lifecolor rust set. As the rubber pads would obviously not rust, I had to pay particular attention to keeping them free of paint. This meant being a little more precise on the outer face rather than slapping it all over. Much like the video I added very diluted coats of the two lighter shades with a brush. I then speckling the same colours taking care to clean the pads after each pass. Once completely dry I just speckled the third rust shade and again had a brush moistened with tap water handy to clean up the rubber pad surface. Once happy with the rust tones I proceeded to add some dirt and dust build up. First with AK Groundwork paste to a few selected areas. Diluted with water it was kept well away from the moveable portions. Once dry I articulated every link to ensure none had been clogged with either the AK mud or indeed a build-up of acrylic paint. A wash of the two lightest shades in Lifecolor's acrylic rust set Taking another tip from Martin’s video I concocted my own acrylic ‘rain wash’ mix using similar tones and washed down both track runs. The last step in the video is to speckle enamel rust wash but I choose to use two diluted mixes of both oil and an oil pigment mix instead. First up a diluted light earth oil wash followed by a speckling of Abtielung light rust oil and MIG pigment rubble dust. (A great mix for manifolds and dry dusty exhausts incidentally) My very last step was to treat the guide teeth to a rustier tone using Lifecolor acrylics. Weathering the chassis Before the tracks and wheels could be attached a small application of dust and dirt was added to the visible portions of the chassis and the undersides of the cab metalwork. This was first carried out with airbrushed buff-coloured acrylics and then to add some texture with AK groundwork paste as used on the tracks. This was added in small amounts to simulate where dirt would have naturally accumulated. The next step was to build up layers of dust and dust. This was applied with a brush over a cocktail stick, speckling mixes of both light and dark earth Abtielung oils with a tiny amount of rubble dust pigments added to a final round. A small application of speckled dark earth and black oils completed the effect.
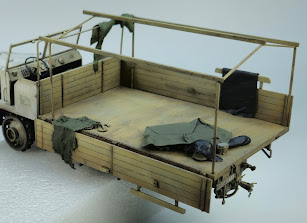
The cargo bed with added oil washes and speckling. Building up the layers of oils under the fenders and track guards.
A mix of Abtielung light rust oil and MIG pigment rubble dust were also
added to the exhaust, leaf springs, sprocket rollers and exposed ends of the
front wheel spokes.
The manifold was also given a light wash as I really liked the appearance of this mix once dry. I know very little will be visible but it’s all good practice 😊 As the vehicle appeared to have been stationary for some time, I figured rainwater would have removed most exposed surface mud so all that is remaining once the oils have dried will be to add streaks to the vertical surfaces. Then it will be onto weathering the track wheels so I can get the running gear attached. |
| Chapter 12 |


No comments:
Post a Comment